# Nearby Service
#### Connecting phones in a P2P network
[](https://xenikii.one)
[](https://github.com/ksenia312/nearby_service/blob/main/LICENSE)
Nearby Service Flutter Plugin is used to create connections in a P2P network.
The plugin supports sending text messages and files. With it,
you can easily create any kind of information sharing application **without Internet connection**.
## Table of Contents
- [About](#about)
- [Android](#android-)
- [IOS](#ios-)
- [Setup](#setup)
- [Android](#android--1)
- [IOS](#ios--1)
- [Usage](#usage)
- [Data sharing](#data-sharing)
- [Text messages](#text-messages)
- [Resource messages](#resource-messages)
- [Additional features](#additional-features)
- [Demo](#demo)
## About
> A peer-to-peer (P2P) network is a decentralized network architecture in which each participant, called a peer, can act
> as both a client and a server. This means that peer-to-peer networks can exchange resources such as files, data or
> services directly with each other without needing a central authority or server.
### Android
For Android, **Wi-fi Direct** is used as a P2P network.
It is implemented through the `android.net.wifi.p2p` module.
It **requires** permissions for `ACCESS_FINE_LOCATION` and `NEARBY_WIFI_DEVICES` (for Android 13+).
It is also important that you need **Wi-fi enabled** on your device to use it.
To check permissions and Wi-fi status, the
`nearby_service` plugin includes a set of methods:
- `checkWifiService()` (Android only): returns true if Wi-fi is enabled
- `requestPermissions()` (Android only): requests permissions for location and nearby devices and returns true if
granted
- `openServicesSettings()`: opens Wi-fi settings for Android and general settings for iOS
> Testing the plugin **is not possible** on Android emulators, as they usually do not contain the Wi-fi Direct function
> in general! Use physical devices for that.
### IOS
For IOS, the P2P connection is implemented through the `Multipeer Connectivity` framework.
This framework **automatically selects** the best network technology depending on the situation—using **Wi-Fi**
if both devices are on the same network, or using **peer-to-peer Wi-Fi** or **Bluetooth** otherwise.
The module will work even with Wi-fi turned off (via Bluetooth), but you can still use `openServicesSettings()` from
the `nearby_service` plugin to open the settings and prompt the user to turn Wi-fi on.
## Setup
### Android
All necessary Android permissions are already in the **AndroidManifest.xml** of the plugin,
so you don't need to add anything **to work with p2p network**.
### IOS
For IOS, you need to add the following values to **Info.plist**:
```
NSBonjourServices
_mp-connection._tcp
UIRequiresPersistentWiFi
NSLocalNetworkUsageDescription
[Your description here]
```
- `NSBonjourServices`
For the `nearby_service` plugin, you should add the value `_mp-connection._tcp`. This key is
required for **Multipeer Connectivity**. It defines the Bonjour services
that your application will look for. Bonjour is Apple's implementation of zero-configuration networking, which allows
devices on a LAN to discover each other and establish connections without requiring manual configuration.
- `UIRequiresPersistentWiFi`
This key is not strictly required for **Multipeer Connectivity** to work. This key is used
to indicate that your application requires a persistent Wi-Fi connection even when the screen is off. This can be
useful for maintaining a network connection for continuous data transfer.
- `NSLocalNetworkUsageDescription`
This key is needed to inform users why your application will use the local network. You must provide a string value
that explains why your application needs LAN access.
> Note that if you want to use the plugin **to send files**, you also need to follow the instructions about permissions
> of the filesystem management package you are using.
## Usage
> The full example demonstrating the functionality can be viewed at
> the [link](https://github.com/ksenia312/nearby_service/tree/main/example_full).
> **Important note:** for functionality that is only available for one of the platforms, you should use the
> corresponding
> API element from `NearbyService`.
>
> For Android:
>
> ```dart
> final _nearbyService = NearbyService.getInstance();
> _nearbyService.android..
> ```
> For IOS:
>
> ```dart
> final _nearbyService = NearbyService.getInstance();
> _nearbyService.ios..
> ```
1. Import the package:
```dart
import 'package:nearby_service/nearby_service.dart';
```
2. Create an instance of NearbyService:
```dart
// getInstance() returns an instance for the current platform.
final _nearbyService = NearbyService.getInstance();
```
3. Initialize the plugin:
```dart
// You can change the device name on a P2P network only for iOS.
// Optionally pass the [iosDeviceName].
await _nearbyService.initialize(
data: NearbyInitializeData(iosDeviceName: iosDeviceName),
);
```
**Extra step for Android:** ask for permissions and make sure Wi-fi is enabled:
```dart
final granted = await _nearbyService.android?.requestPermissions();
if (granted ?? false) {
// go to the checking Wi-fi step
}
```
```dart
final isWifiEnabled = await _nearbyService.android?.checkWifiService();
if (isWifiEnabled ?? false) {
// go to the starting discovery step
}
```
**Extra step for IOS:** ask the user to choose whether they are a Browser or Advertiser:
> In IOS Multipeer Connectivity, there are 2 roles for the discovery process and connection between devices: **browser**
> and **advertiser**.
>
> **Browser**: This component discovers nearby devices that report their availability. It is
> responsible for finding peers that advertise themselves and inviting them to join the shared session.
>
> **Advertiser**: This component advertises the availability of the device to nearby peers. It is used to let know
> the browser that the device is available for inviting and connecting.
The code for selecting a role:
```dart
_nearbyService.ios?.setIsBrowser(value: isBrowser);
// go to the starting discovery step
```
4. Start to discover the P2P network.
```dart
final result = await _nearbyService.discover();
if (result) {
// go to the listening peers step
}
```
5. Start listening to peers:
```dart
_nearbyService.getPeersStream().listen((event) => peers = event);
```
6. Each of the peers is a `NearbyDevice` and you can connect to it:
> Remember that when used on the Android platform, you can only pass `NearbyAndroidDevice` to the `connect()` method.
> Similarly for iOS, `NearbyIOSDevice`. Devices automatically come from the discovery state in the correct type, so you
> just need to use the received data.
```dart
final result = await _nearbyService.connect(device);
if (result) {
// go the the listening the device step
}
```
7. Once you are connected via P2P network, you can start listening to the connected device. If `null` comes from the
stream, it means the devices lost connection.
```dart
_connectedDeviceSubscription = _nearbyService.getConnectedDeviceStream(device).listen(
(event) async {
final wasConnected = connectedDevice?.status.isConnected ?? false;
final nowConnected = event?.status.isConnected ?? false;
if (wasConnected && !nowConnected) {
// return to the discovery state
}
connectedDevice = event;
},
);
```
8. Once you have connected over a P2P network, you still need to create a **communication channel** to transfer data.
For Android, this is a **socket** embedded in `NearbyService`, for iOS it's a setup to listen to messages and
resources from the desired device. There is a method `startCommunicationChannel()` for this purpose. You should pass
to it listeners for messages and resources received from the connected device. There can only be one communication
channel, if you create a new one, the previous one will be **cancelled**.
```dart
final messagesListener = NearbyServiceMessagesListener(
onData: (message) {
// handle the message from NearbyServiceMessagesListener
},
);
final filesListener = NearbyServiceFilesListener(
onData: (pack) async {
// handle the files pack from NearbyServiceFilesListener
},
);
await _nearbyService.startCommunicationChannel(
NearbyCommunicationChannelData(
connectedDevice.info.id,
messagesListener: messagesListener,
filesListener: filesListener,
),
);
```
9. I think you've already guessed that since there are listeners of messages from another device, we can send them
ourselves too :) There is a method `send()` for that:
```dart
_nearbyService.send(
OutgoingNearbyMessage(
content: NearbyMessageTextRequest.create(value: message),
receiver: connectedDevice.info,
),
);
```
## Data sharing
This is a very important topic for the `nearby_service` plugin because it provides unique functionality for sharing
typed data.
First, it's essential to say that when you send a message, you are required to pass the `OutgoingNearbyMessage` model.
This contains the `receiver` - the recipient to whom the message is addressed. The receiver is someone with whom you
already have an established communication channel. Also `OutgoingNearbyMessage` contains a `content` field, it can be
one of 4 types:
- `NearbyMessageTextRequest`
- `NearbyMessageTextResponse`
- `NearbyMessageFilesRequest`
- `NearbyMessageFilesResponse`
We will talk more about them later.
Second, there is another type of message, `ReceivedNearbyMessage`. This is what comes to you from
the `NearbyServiceMessagesListener`. It contains a `sender` field so that you can identify who the message came from and
use that information.
### Text messages
Description of the operating logic:
1. One of the devices sends a message using the `send()` method:
```dart
// DEVICE A
_nearbyService.send(
OutgoingNearbyMessage(
content: NearbyMessageTextRequest.create(value: message),
receiver: connectedDevice.info,
),
);
```
2. Another device receives the `ReceivedNearbyMessage` with content cast as `NearbyMessageTextRequest` from the
`NearbyServiceMessagesListener`.
```dart
// DEVICE B
final messagesListener = NearbyServiceMessagesListener(
onData: (message) {
// message is ReceivedNearbyMessage with content cast as NearbyMessageTextRequest here
},
);
```
3. If you want the sender to make sure the message has been received, you can send them `NearbyMessageTextResponse`. You
need to add the `id` from the received `NearbyMessageTextRequest` to it:
```dart
// DEVICE B
_nearbyService.send(
OutgoingNearbyMessage(
receiver: connectedDevice.info,
content: NearbyMessageTextResponse(id: requestId),
),
);
```
4. If everything is fine, the sender will receive your `NearbyMessageTextResponse` from
their `NearbyServiceMessagesListener`:
```dart
// DEVICE A
final messagesListener = NearbyServiceMessagesListener(
onData: (message) {
// message is ReceivedNearbyMessage with content cast as NearbyMessageTextResponse here
},
);
```
> Throughout the process, you can use the `id`s of the messages to identify them.
### Resource messages
Description of the operating logic:
1. One of the devices sends a message with `NearbyMessageFilesRequest` using the `send()` method:
```dart
// DEVICE A
_nearbyService.send(
OutgoingNearbyMessage(
// files here is List, it can be easily created from the file path: NearbyFileInfo(path: file.path)
content: NearbyMessageFilesRequest.create(files: files),
receiver: connectedDevice.info,
),
);
```
2. Another device receives the `ReceivedNearbyMessage` with content cast as `NearbyMessageFilesRequest` from the
`NearbyServiceMessagesListener`.
> The file request comes from the `NearbyServiceMessagesListener` because it doesn't contain the transferred files, only
> the request to send them! For files, confirmation by the other party before starting the data transfer is required!
```dart
// DEVICE B
final messagesListener = NearbyServiceMessagesListener(
onData: (message) {
// message is ReceivedNearbyMessage with content cast as NearbyMessageFilesRequest here
},
);
```
3. In order to receive the files, the other party must confirm that it wants to do so and send a message
with `NearbyMessageFilesResponse` content. The `NearbyMessageFilesResponse` contains the `isAccepted` field,
which will determine whether the file sending will start or not.
> If you don't want to use confirmation logic to send files, just send the automatic positive responses
> to `NearbyMessageFilesRequest` in `NearbyServiceMessagesListener`.
```dart
// DEVICE B
_nearbyService.send(
OutgoingNearbyMessage(
receiver: connectedDevice!.info,
content: NearbyMessageFilesResponse(
id: request.id,
isAccepted: isAccepted,
),
),
);
```
4. The sender will receive `NearbyMessageFilesResponse` in their `NearbyServiceMessagesListener` and can notify the
user.
```dart
// DEVICE A
final messagesListener = NearbyServiceMessagesListener(
onData: (message) {
// message is ReceivedNearbyMessage with content cast as NearbyMessageFilesResponse here
},
);
```
At this time under the hood, the sending of files will begin and the recipient will receive `ReceivedNearbyFilesPack` in
the `NearbyServiceFilesListener` when sending is complete. `ReceivedNearbyFilesPack` holds the paths of the received
files already stored on the device's temporary directory. You can overwrite them to the desired location, delete them,
or do anything else you like.
```dart
// DEVICE B
final filesListener = NearbyServiceFilesListener(
onData: (pack) async {
// pack is ReceivedNearbyFilesPack here
},
);
```
## Additional features
- Each `NearbyDevice` contains `NearbyDeviceInfo` that presents different meanings depending on the platform. For
Android `id` is the MAC address of the device, and for iOS it is the unique identifier of its MCPeerID. In general, id
identifies the device
in its platform.
- Use the getter `communicationChannelState` of `NearbyService` to know the state of the communication channel. It may
be:
```dart
enum CommunicationChannelState {
notConnected,
loading,
connected;
bool get isNotConnected => this == CommunicationChannelState.notConnected;
bool get isLoading => this == CommunicationChannelState.loading;
bool get isConnected => this == CommunicationChannelState.connected;
}
```
The getter is `ValueListenable` so you can listen to its state.
- There are methods `getPlatformVersion()` and `getPlatformModel()` of `NearbyService` to determine the version and
model of the device respectively. You can use them to specify a
name for the IOS.
- Use `getCurrentDeviceInfo()` of `NearbyService` to get information about the current device on the P2P network. Note
that the ID obtained from `getCurrentDeviceInfo()` for Android will always be **02:00:00:00:00:00** for privacy
issues.
- For Android, it is possible to listen to the current state of the connection using
method `getConnectionInfoStream` of `NearbyAndroidService`.
- When you are creating a service with `getInstance()`, you can define the logging level in the plugin using
field `logLevel`.
Possible logging levels:
```dart
enum NearbyServiceLogLevel {
debug,
info,
error,
disabled,
}
```
## Demo
### Android
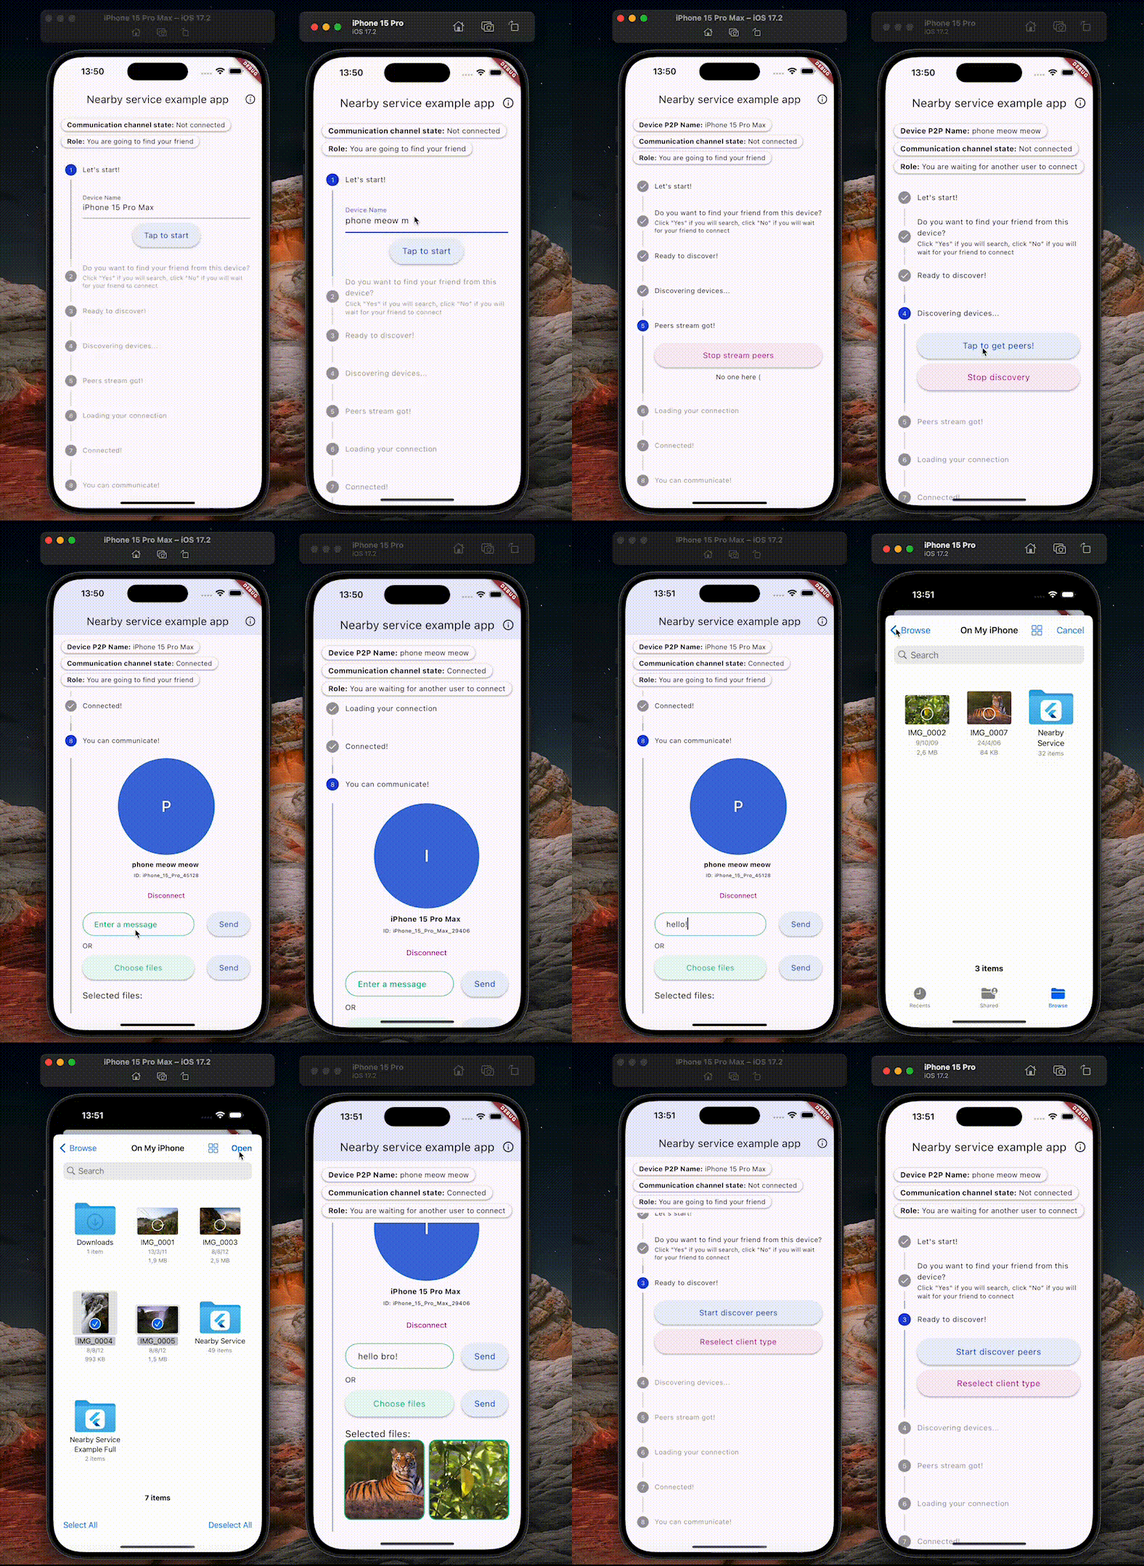
### IOS